Wednesday, May 8, 2013

Solution on MP4 Won’t Play on DVD Player

When try to create DVD from MP4 files, only to find can’t burn MP4 to DVD? Though successfully burnt MP4 video to DVD disc, only to find can’t play the created MP4 DVD files on DVD player? So what brought this on? How to solve these issues and successfully burn and play MP4 on DVD player? The following article will give the answer!

Why Can’t Burn or Play MP4 on DVD Player?
Most DVDs have to use MPEG-2 or DivX, if you try to directly burn MP4 to DVD or your DVD burner app has no function of converting MP4 to MPEG-2, DivX, you will fail to burn MP4 to DVD disc.

Even if you have successfully burn MP4 to DVD without converting, you will still encounter issues in playing MP4 on DVD player: Regular standalone DVD players can only read movie DVD’s (those are in MPEG-2, and if you view them in Windows Explorer, you see a folder structure with VIDEO_TS, and files like .VOB .IFO and .BUP). Newer DVD players that are DivX-certified can (in addition to the above) read data DVD’s with an AVI file encoded in the DivX codec. Most of the time, you will fail to play MP4 on DVD player unless the DVD players have the “Nero Digital” label on them.

How to Play MP4 on All Kinds of DVD Players?
In order to burn MP4 to DVD for successfully playing on various DVD players, we had better find a powerful MP4 to DVD Video Converter which will automatically convert MP4 to DVD disc or DVD player compatible format.

Below will introduce the free download link of the just right MP4 to DVD Converter and a detailed guide on how to use this wonderful tool to successfully convert MP4 to DVD format for burn MP4 to DVD or play MP4 on DVD player.

Free download link
Free download the right version of this MP4 to DVD Converter (Windows version, Mac version) according to your computer type.

Besides converting MP4 to DVD format, this powerful video converter also supports to convert 3GP, 3G2, ASF, AVI, DAT, DV, VOB, FLV, MKV, DVS(R)-MS, MPG, MPEG, TS, MOV, RM, RMVB, WMV, NSV, M2TS, MTS, MOV and etc to DVD supported video format

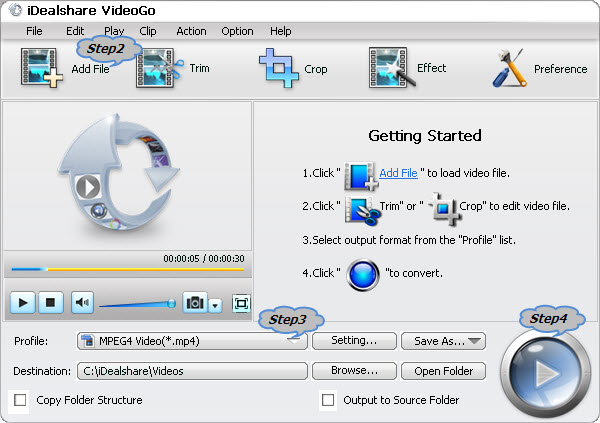
Step 1 Import MP4 files
Click “Add File” button to import MP4 videos which you want to burn to DVD for play on DVD player.


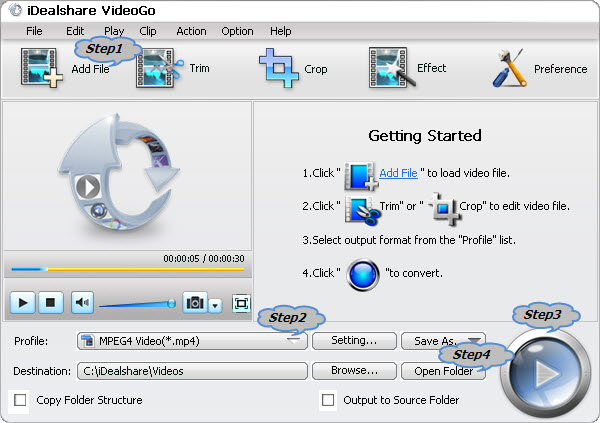
Step2 Select DVD player compatible DivX or DivX HD Video as output profile
Click the small triangle to the right of “Profile” and set “DivX Video (*avi)” as the output format from “General Video” Category.
To play HD MP4 on HD DVD player or Blu-ray disc Player, choose “DivX HD Video (*.avi)”from the “HD Video”category.

Step 3 Convert MP4 to DVD supported DivX or DivX HD
Click “Convert” button to convert MP4 to DivX or DivX HD.

Step 4 Burn MP4 to DVD for play MP4 on DVD player
Click “Open Folder” button to locate the converted MP4 files when your conversion is done, then simply burn the converted MP4 to DVD just as you burn other video to DVD disc, then simply play MP4 on DVD player as you like

Resources
Solution on MP4 Won't Play on DVD Player

FLAC to DVD Audio Solution

Easy Way to Burn 24-bit/48kHz FLAC to DVD Audio, 24-bit /96 kHz FLAC to DVD-A, 24-bit /192 kHz FLAC to music DVD.

Though there are many DVD Burners on the market, most of them only support burn video to DVD. Though some of the DVD Burners support burn music to DVD-Audio, few of them enables to burn FLAC to DVD especially burn 192/24 in stereo and 96/24 in 5.1 FLAC to DVD.

Is there no way to burn FLAC to DVD-A? Of course Not! It will become so easy in burning FLAC to DVD audio as soon as you follow the step by step guide below.
Besides helps to burn FLAC to DVD audio, the guide also helps to burn MP3, WAV, WMA, AIFF, OGG, M4A and etc to DVD-A.

Step 1: Free download FLAC to DVD Converter
Free download the powerful FLAC to DVD Converter – iDealshare VideoGo (Mac version, Window version), install and run it.

Acting as the powerful FLAC to DVD Audio Converter, iDealshare VideoGo Mac or Windows can fast convert FLAC to DVD Audio format like MP3 with fast speed and high output audio quality. And it supports converting all kinds of FLAC audio whatever it is in 24-bit/48kHz, 24-bit /96 kHz or 24-bit /192 kHz and etc.

Beside converting FLAC to DVD A for fast burn to DVD audio, iDealshare VideoGo can also convert all other audio/video formats such as MP3, WAV, AAC, AC3, WMA, OGG, MPEG, VOB, MP4, TS, RM, WMV, 3GP, FLV, HD TS, HD WMV, etc.

Step 2 Add FLAC audio files


Step 3 Set DVD supported audio format
Click “Profile” drop-down button to select DVD supported audio format like MP3 as output profile.

Step 4 Convert FLAC to DVD Audio format
Click Start Burn button to start converting FLAC to DVD supported audio format, it will be finished in few minutes.

How to Play 1080p or 720p MKV on DVD Player?

Sometimes we have lots of MKV movie files in hands and want to burn them to DVD for playing MKV on DVD player or TV. Unfortunately, we even cannot burn MKV to DVD especially burning 720p/1080p MKV to DVD, let alone to play MKV on DVD player or TV.

The following article just aims to provide a step by step guide on how to convert 1080p or 720 p MKV to DVD format so as to successfully burn MKV to DVD for playing MKV on DVD player successfully.

This guide can easily help to:
Convert 1080p MKV to DVD format to burn 1080p MKV to DVD
Convert 720p MKV to DVD format to burn 720p MKV to DVD
Convert MKV files in other resolution to DVD format to burn MKV to DVD for play MKV on DVD player
Convert MKV to DVD format for successfully playing MKV files on any kind of DVD player
Convert other video files including AVI, WMV, MP4, MPG, FLV, AVCHD, MOV, 3GP, WTV, MXF, and etc to DVD fomrat

Preparation: Run MKV to DVD Converter
Free download this MKV to DVD Converter – iDealshare VideoGo (Windows Version, Mac Version), then install and run it

Step 1 Add MKV files
Click the “Add files” button to import the MKV files which you like to convert to DVD format.


Step 2 Set DVD supported video format
Click “Profile” drop-down menu to select “DivX Video (*avi)” as the output format from “General Video” Category.

To play HD MKV on HD DVD player or Blu-ray disc Player, choose “DivX HD Video (*.avi)”from the “HD Video”category.
You can also customize output video quality in the “Advanced Setting Window” by click “Setting…” button to change video bitrate, aspect ratio, keep video quality as true and so on.

Step 3 Finish conversion
Click “Convert” button to start and finish converting MKV to DVD supported format for successful burn MKV to DVD or play MKV on DVD players.

Tuesday, May 7, 2013

How to Transfer MP3 from iPod to Windows8, 7, Mac OS X Mountain Lion?

 Tags: transfer mp3 from ipod to windows 8, transfer mp3 from ipod to mac mountain lion


Just as we know, iTunes only allows syncing MP3 from computer to iPod but cannot transfer MP3 from iPod to computer. Ever thought to move MP3 music files from iPod to Windows 8, Windows 7, Windows Vista, Windows XP and etc or copy MP3 from iPod to Mac OS X Mountain Lion, Lion and etc?

The following article will introduce 3 methods on how to successfully copy MP3 from iPod to computer.

Method 1 Transfer MP3 from iPod to Computer by iCloud
This method helps to automatically download new MP3 purchases from iPod to computer the moment you tap Buy. It also helps to transfer past MP3 purchases from iPod to computer wirelessly and without syncing.
Step 1 Get iCloud up and running on your iPod
1. Make sure your device is running the latest version of iOS.
If you’re setting up a new iOS device, or to update to the latest version of iOS, go to the Settings menu, tap General, and tap Software Update to see if there’s an update available.
2. Turn on iCloud.
When you turn on a new iOS device or after you’ve completed the update to the latest version of iOS, follow the instructions in the setup assistant to activate your device and set up iCloud.1
If you skipped the setup process, tap the Settings icon on the Home screen, select iCloud, then enter your Apple ID.
3. Customize your settings.
Tap the Settings icon and select iCloud. Tap the On/Off switches to enable individual iCloud services. To enable iCloud Backup, tap Storage & Backup and turn on iCloud Backup.
4. Enable automatic downloads in Store settings.
To enable automatic downloads for your music, apps, and books, tap the Settings icon on the Home screen and select Store.
Step 2 Set up iCloud for your Windows PC
1. Download the iCloud Control Panel.
To enable iCloud on your Windows PC, first set up iCloud on your other devices, then install the iCloud Control Panel for Windows (Windows Vista with Service Pack 2 or Windows 7 required). Download now
2. Turn on iCloud.
From the Windows Start menu, choose iCloud Control Panel.
Enter the Apple ID you used to create your iCloud account and select the iCloud services you’d like to enable.
For mail, contacts, and calendars, you can use iCloud.com or Outlook 2007 or later.
3. Enable automatic downloads.
To enable automatic downloads for your music, apps, and books, open iTunes > Edit > Preferences > Store and select Music, Apps, and Books.* (Requires iTunes 10.5 or later.)

Method 2 Copy MP3 from iPod to Computer with iTunes Match
This method even helps to transfer MP3 files not purchased with iTunes from iPod to computer.
1. Go to iTunes on your computer, choose “Turn On iTunes Match” from the Store menu, enter your Apple ID and password, and click Subscribe.
2. iTunes Match will start scanning and matching your library and uploading your music to iCloud right away
3. When it’s finished, you’ll see an iCloud icon in your iTunes library next to those songs stored in the cloud.
4. To turn on iTunes Match on your iOS devices, go to Settings, tap Music, and turn on iTunes Match.

Method 3 Transfer MP3 from iPod to Windows by iPod to Computer Transfer

Step 1: Free download and launch iPod to Computer Transfer (for Windows, for Mac), then plug in your iPod, then your device name will appear in the list.

iPod to Windows Transfer

Step 2: Please select “Music”
Locate the library or playlist in which your songs stayed and check the songs to be transferred in the file list on the right window.

Step 3: Transfer MP3 from iPod to Windows
Click the “Export to Local” button to select the target folder for saving iPod files in the dialog that appears, and then start to transfer MP3 to computer.

Tips: You can directly drag selected songs to Windows Explore for fast copy.
This guide also applies applies to transfer MP3 from iPod to Mac as long as you download the iPod transfer Mac version.

Related articles:
How to Transfer Music/Video from iPad 2 to PC/Mac/iPad4/mini/iPhone/iPod 
How to Transfer Music/Movies from iPhone 4S to iPhone 5/iTunes/PC/Mac? 
iPad mini Transfer:Copy among iPod,iPad,iPhone,iPad mini,PC,Mac
 

How to Set CAF as iPhone Ringtone?

 Tags:caf as iphone ringtone, caf to m4r, set caf as ringtone for iphone

CAF, short for Core Audio Format, is a flexible, state-of-the-art file format for storing and manipulating digital audio data developed by Apple Inc. CAF provides high performance and flexibility and is scalable to future ultra-high resolution audio recording, editing, and playback. Soundtrack Pro and Logic Studio use the .caf format extensively for their loop and sound effects library, particularly for surround-sound audio compressed with the Apple Lossless codec.

Ever dreamed to turn the high audio quality CAF files as ringtones for iPhone 5/4S/4/3GS/3G? If so, you come to the right place. The following will introduces 3 methods for us easily convert CAF to M4R as iPhone ringtone.

Method 1 By iPhone Ringtone Maker
  • This method applies to convert all kinds of CAF audio to M4R including converting 6 channel CAF to M4R, 8 channel CAF to M4R, and other CAF files to M4R
  • This method also applies to convert other audio formats to M4R like converting MP3, MP2, AAC, AC3, WAV, WMA, M4A, RM, RAM, OGG, AU, AIF, AIFF, APE, and FLAC to M4R.
  •  
  • Preparation: Launch iPhone Ringtone Maker for Mac or Windows

    Free download the professional CAF to M4R Converter – Bigasoft iPhone Ringtone Maker (Mac version, Windows version), and then install and launch the software.
    iphone ringtone maker mac version

    Step 1: Add CAF files
    Click “Browse…” button to add your CAF files that you want to set as ringtone; or your can directly drag and drop your file to the mail interface of this iPhone Ringtone Maker.
    Convert CAF to M4R as iPhone Ringtone

    Step 2 Set Start Time and End Time for ringtone
    Type in the start time of your ringtone in the text box next to "Start Time"
    Type in the end time of your ringtone in the text box next to "End Time"
    Make sure the ringtone is no longer than 40 seconds
    If your want to make ringtone longer than 40 seconds, you may refer to How to make iPhone ringtone longer than 40 seconds

    Step 3 Set ringtone volume (Optional)
    Drag and release on "Volume Maker" slider to set ringtone to desired volume level.

    Step 4: Make CAF as iPhone ringtone and transfer to iPhone or iTunes
    Connect iPhone to computer, check before "Export to iPhone" and "Export to iTunes", and then click "Generate" button, this ideal Ringtone Maker for iPhone will fast create ringtone from the source file as well as transfer the created ringtone to the ringtone folder in both your iPhone and iTunes.

    Method 2: By iTunes
    (I will use example.ext to explain the process)
    .caf to m4r: change example.caf to example.aiff >drag example.aiff into itunes music section > convert example.aiff using the iTunes AAC encoder – in settings (this will change it to example.m4a) > Drag the newly created file from iTunes to the desktop > Change example.m4a to example.m4r > OR leave example.m4a if you need it as m4a > Finished.

    Method 3: By GarageBand
    Import the .caf files to GarageBand and then sharing the CAF files as ringtone.

    Resources
    iPhone 4S Ringtone Maker - How to Make Ringtones for iPhone 5/4S/4/3GS/3G
     How to Boost iPhone Ringtone Volume to Desired Level
    How to Make Text Tones for iPhone 5/4S/4/3GS/3G?

    How to Transfer MP3 to iPod without iTunes?

    Tags: transfer mp3 to ipod without itunes, transfer wav to ipod without itunes, transfer m4a to ipod without itunes

    Easy way to copy and add MP3 music to iPod touch 5/touch 4, iPod classic, iPod nano, iPod shuffle without iTunes! MP4, AIFF, M4A, WAV, AC3 are also supported!
    Just as we know, iTunes is the default app for us to transfer music like MP3 to iPod from computer. Have you ever dreamed to transfer MP3 to iPod without iTunes? If so, you come to the right place!
    The following article will introduce powerful MP3 to iPod Transfer tool as well as a step by step guide on how to copy MP3 to iPod without iTunes.
    This guide applies to:
    • Transfer MP3 to iPod without iTunes from Mac or Windows
    • Add MP3 to all versions of iPod including iPod classic, iPod mini, iPod nano, iPod shuffle and iPod touch with no help of iTunes
    • Transfer other music like AAC, AIFF, Apple Lossless M4A, and WAV from computer to iPod even without iTunes
    • Transfer video MP4, MOV, and M4V without iTunes from Mac or Windows to iPod
    • Copy video or audio to iPad, iPad mini, iPhone 5, iPhone 4S, iPhone 4, iPhone 3GS, iPhone 3G with no help of iTunes

    How to Copy MP3 to iPod without iTunes?
    The following is a step by step guide on how to transfer MP3 audio from computer to iPod even without iTunes

    Step 1 Run MP3 to iPod Transfer
    Free download the professional MP3 to iPod Transfer (Windows Version, Mac Version), install and run it.
         

    Step 2 Connect iPod to computer
    Connect iPod to computer, all info consisting of iPod device itself and iPod library folder are shown in the interface of the MP3 to iPod transfer for Mac or Windows

    Step 3 Add MP3 to iPod
    Open the Music folder under iPod devices where you like to add MP3.
    Then cick the “Add Files to iPod” or “Add Folder to iPod” button to Locate and import the MP3 files from your computer.

    Resources
    How to Transfer Music/Video from iPad 2 to PC/Mac/iPad4/mini/iPhone/iPod 
    How to Transfer Music/Movies from iPhone 4S to iPhone 5/iTunes/PC/Mac? 
    iPad mini Transfer:Copy among iPod,iPad,iPhone,iPad mini,PC,Mac